

To install the Geniki Taxydromiki Voucher for WooCommerce you will need to contact with Geniki Taxydromiki to obtain the required Web Services in order to function the plugin. Then, after you complete the purchase of the plugin by us, you should proceed to the following steps:
Installation and activation
- You log in to your website with administrator rights.
- From the control panel select “Plugins” and then “Add New Plugin”.
- At the top of the page select “Upload Plugin”.
- From the box that will appear, click on “Select file” and in the pop-up window, select the .zip file that was downloaded from our website, during your purchase.
- Click “Install Now” from the dialog box.
- After the file is successfully uploaded, you will be presented with the “Activate Plugin” option, which you select.
Plugin settings
Next, you will need to perform test procedures, which are required to check for proper operation. For this reason, you must assign the test codes (Username, Password, API) sent to you by the Geniki Taxydromiki after your communication. More specifically:
- Where “Username”, “Password” and “API” the data from the courier company e-mail.
- In the field “Auto closing of pending jobs” you can fill in the desired time for closing the collection list, in case you fail to do it manually. This option is mandatory and marks the end of the day, in order to inform the courier company about the orders that are to be sent.
- In “Debug” you can enable the retention of the transaction log.
- Then, in “Disable on Specific Payment Gateways” selected the payment methods” select, if you have, payment gateways for which vouchers will not be automatically issued.
- Similarly, in the “Disable on Specific Shipping Methods” you select shipping methods that will be excluded from the automatic version.
- The “Default Weight” field sets the default package weight value when not specified when ordering. In case the weight sizes of the products are determined, it is calculated automatically. Note that the voucher version cannot be completed for zero weight order.
- Then, in the “Print voucher” item, select if you want the vouchers to be printed in booklet size (A4) or sticker size (A6) by default.
- The next option indicates the state of the environment in which you are operating and initially, you should select “Enable test mode“. At the end of the successful test mode you will be able to disable this option.
- The “Auto issue” option allows the voucher version to complete the order without the manual version, that is, the order automatically goes to the “Complete” mode.
- In the last two fields you fill in your e-mail and the API you received by purchasing the plugin, in order to ensure its correct operation and automatically receive updates of new versions.
- Click save changes to complete the test settings.
- “Export orders” enables, through the WooCommerce Order Tracking plugin, to export to a CSV file a list of the vouchers of the orders you want.

Test voucher
Geniki Taxydromiki requires testing the functions of issuing voucher, printing, deleting it, as well as the Close of Pending Jobs. To carry out the test, the following is sufficient:
- From the control panel select WooCommerce and then “Orders”.
- You select a pending/processing order and click on its ID to open it.
- After the order details have loaded, from the options on the right of the window, click “Create voucher”. Once the creation is completed successfully, the voucher number will appear at the top of the right column. Then the buttons for printing or canceling the specific voucher will become available.
- Click the “Print” button to display the test voucher in a PDF file and save it.
- From the the Control Panel, select “Jobs” and then “Close pending jobs (Geniki Taxydromiki Courier)” to close the test of pending jobs.
- To complete the test scenario, click the “Cancel” button.
- After completing the above steps, you inform the courier company of the successful completion of the test scenario. In the communication e-mail you will attach the PDF file with the test voucher. Wait for them to send you the production codes, which you fill in in the same way as described above.
Instructions of the Geniki Taxydromiki Voucher for WooCommerce plugin
Useful information
- After the successful installation of the plugin, when opening an order, the column with the voucher options appears on the right side of the screen. The first part of this column shows the voucher number, voucher status and shipping status, if a new one has been issued. The voucher status is either open or closed and indicates if the voucher created is active, while the shipping status indicates at which stage of the shipment the parcel is located and is informed by the courier company automatically.
- Then, in the next box there are the fields “Parcels”, “Weight”, “Cash on delivery price”, “Services” and “Comments”, which attribute the properties that accompany the voucher. Specifically, in the first field of this box, the total number of parcels that accompany the specific order is entered and has as default the number one. In the second field, the weight of the order is entered in case it cannot be calculated automatically. If left blank, the weight will be set as the default value selected from the plugin settings.
- In case the customer has chosen cash on delivery as a method of payment, below the weight field, an additional field appears, “Cash on delivery”, in which you can modify the amount. Additionally, there is the option of additional services, such as delivery on Saturday. In the last field, any accompanying order comments are entered.
- It should be noted that through the Web Services the vouchers are directly printed by the respective courier company. Therefore, you cannot make changes to the information displayed on the voucher. Also, you cannot use already pre-filled sheets to print the voucher’s details.
- To select several services press control + click on the ones you wish to appear on the voucher. The cash on delivery service will appear automatically if the customer chooses cash on delivery as a payment method. In the event that they has chosen another payment method, then no service will be chosen and the parcel will be considered paid.
- If you have closed pending jobs, the system of Geniki Taxydromiki considers that you have printed and sent the parcels. In case you create new vouchers, you will have to close pending jobs again.
- For any problem that may arise, there is at the end of the column the cancellation of the voucher that has been created. However, before proceeding with this action, it is mandatory to contact the Geniki Taxydromiki.
Manual voucher creation
To issue a new voucher, after filling in the necessary information, click on the “Create voucher” button and the details will automatically appear in the first box of the column.

Then, with the successful completion of creating a new voucher, the following options are activated, Print and Cancel voucher. Before selecting a print option, you can choose its size from the “Flyer”, which corresponds to A4, and the “Sticker”, which corresponds to A6.
At the end of the column there is the cancellation of the voucher that has been created. However, before proceeding with this action, it is mandatory to contact with Geniki Taxydromiki.

Create/ print bulk vouchers
In addition, it is possible to issue vouchers in bulk by following the steps below. From the settings of the plugin, you activate the option “Auto issue”, if you have not already activated it. Then, from the “Orders” option of WooCommerce, select as many orders as you want and then, from the bulk editing options at the top left of the list, select “Change status to completed”. In this way, the selected orders are converted into complete ones and the vouchers are issued automatically, after the corresponding option of the plugin is activated.

It is also possible to mass print or cancel vouchers. More specifically, from the Jobs in the Control Panel, you can select the orders whose vouchers you would like to print and at the top of the page, from the drop-down list of actions, choose “Print or Cancel Jobs (Geniki Taxydromiki)” and “Apply”.

Close pending jobs
Closing pending jobs marks the end of the day to inform the courier company of the orders to be shipped. You can either set from plugin settings by adding the desired time you want the pending jobs to be automatically closed either by going from the Control Panel to Jobs and select “Close pending jobs (Geniki Taxydromiki)” button.

Order tracking
To add shipping tracking to your online store, you can create a new page and paste the shortcode [webexpert_geniki_taxydromiki_track_form].


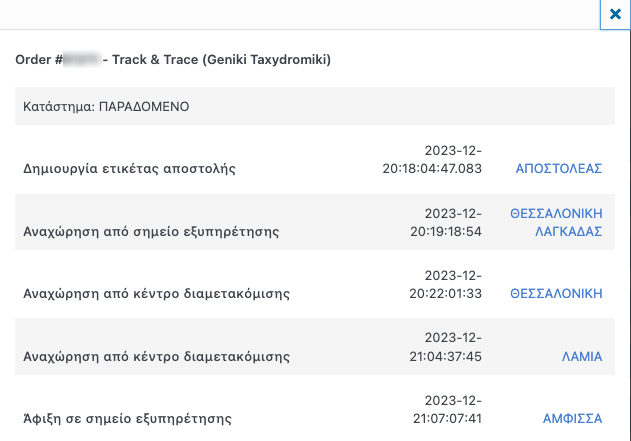
Track & Trace
You can see the comments on the shipping status of each order by clicking on the question mark.
To see the progress of the order, you can click on the voucher number.

For more information please look up to FAQ and Developers tabs on our plugin’s page.
For any problem or question that arises, do not hesitate to contact us at support@webexpert.gr
