

Installation and activation
- You log in to your website with administrator rights.
- From the control panel select “Plugins” and then “Add New Plugin”.
- At the top of the page select “Upload Plugin”.
- From the box that will appear, click on “Select file” and in the pop-up window, select the .zip file that was downloaded from our website, during your purchase.
- Click “Install Now” from the dialog box.
- After the file is successfully uploaded, you will be presented with the “Activate Plugin” option, which you select.
Basic informations
- Among the functions provided by our plugin, the most basic ones are the display of the selection of invoice fields on the order completion page.
- You also have the option of issuing invalid documents and delivery note.
- In addition, you are given the option, if you wish, to automatically convert all characters in uppercase in the fields of the customer’s business information, on the order completion page.
- You save the changes so you have access to the basic functions.
It should be noted that our plugin, as mentioned above, has the ability to communicate with AADE, in order to provide some automated functions. Specifically, by completing the VAT number, the following functions are performed:
- Check the validity of VAT through IAPR.
- Auto-completion of the invoice fields on the order completion page (DOY, Activity, Company Name, City, Address & Zip Code).
- Auto-completion of invoice fields in order processing.
- Exemption based on POL. 1150/29.9.2017.
- Exemption based on article 39a.
- Reduced VAT on Greek islands (Leros, Lesvos, Kos, Samos, Chios).
- VAT number verification via VIES.
- VAT exemption when the buyer has a valid VAT number based on VIES.
- VAT exemption when the buyer wishes to issue an invoice and is from a third country.
Alternatively, if you wish to make use of the more advanced features you can proceed to the steps described below:
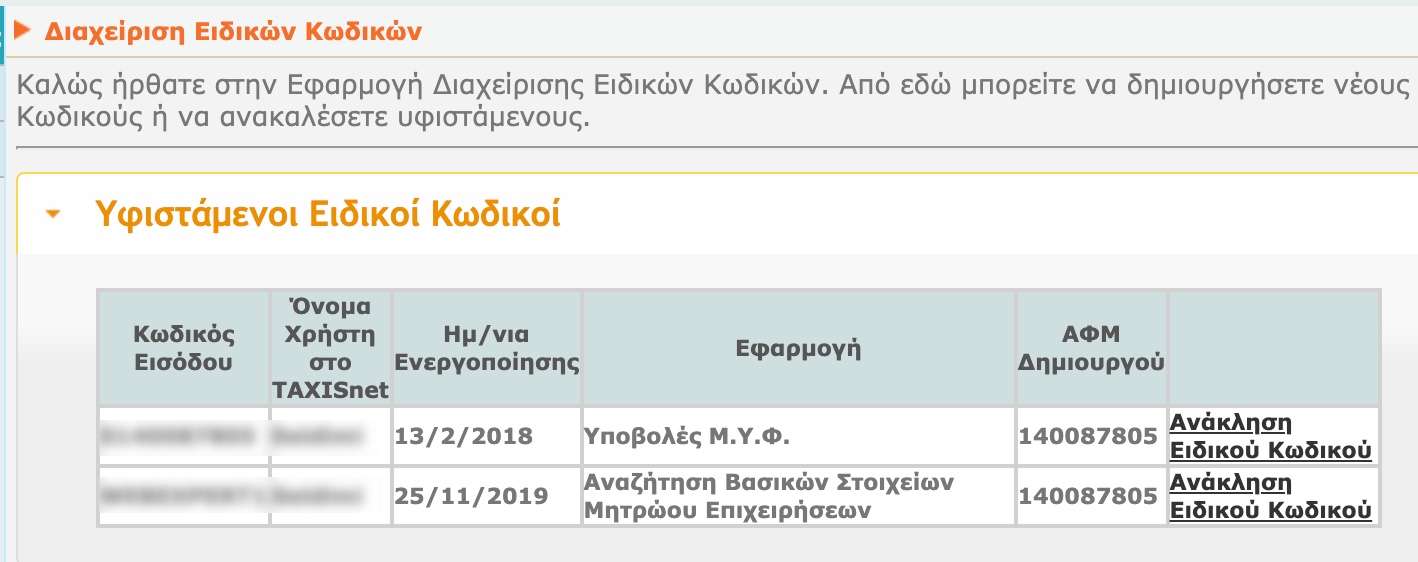
- So, if you wish, to activate the control through AADE you must follow the steps of registration and obtaining special codes that you will find on the page https://www.aade.gr/epiheiriseis/forologikes-ypiresies/mitroo/anazitisi-basikon-stoiheion-mitrooy-epiheiriseon.
- If you have already registered in the system and have not yet obtained the special passwords through the application “Special Password Management”, you can issue new ones by selecting through the system “Available Services” and in the box where it states “Search for Basic Business Registry Elements” , click on “Create a special password”.
- If you already have passwords, the “Existing Passwords” box will display the “Search Business Registry Basics” box and if you have forgotten them, you can create new ones by selecting “Revoke a special password” and then, from the Available Services, “Create a special password ”.
Initial settings
Checkout settings
- In the fields ” VAT ID“, “IAPR Username” and “IAPR Password”, enter you VAT ID and the codes you created previously. In the IAPR username, fill in the TAXISnet username and in the IAPR Password the password code you created. The information you will fill in the plugin will be for the Basic Business Register Search.
- To be sure of the validity of your details, the “Check IAPR Connection” button allows you to check whether your communication with IAPR is successful. In case of an error, it shows exactly what problem was encountered during the attempt.
Vat Validation
- The “ Validate VAT number via IAPR” option, when is activated, when filling in the VAT on the order completion form, the validity of the number assigned by the customer is checked and displayed similar message, in case of error.
- The next option, “Autocomplete details via IAPR”, when it is selected, the fields of the order form regarding the brand and the rest of the information are filled in automatically, through IAPR of the buyer, when he fills in his VAT number.
- Where “ Validate VAT number via VIES”, the option for automatic TIN check via the VIES system. When this option is activated, by entering the customer’s VAT number in the corresponding field of the order form, the VIES system responds positively to the validity check, only if the buyer has activated intra-community transactions for the specific VAT number.
Debug
The “Debug mode” option serves to receive the reading messages from IAPR for debugging error cases. In case you face any problem when communicating with IAPR, (e.g. the corresponding fields are not filled in automatically, when entering VAT number), activate this option, change the arguments of the following functions in the wp-config.php file, as follows:
define('WP_DEBUG', true);
define('WP_DEBUG_LOG', true);
define('WP_DEBUG_DISPLAY', false);
and run a hypothetical scenario (typing VAT number in the data filling form for issuing an invoice). Next, go to the wp-content folder and open the debug.log file, where you can find the error messages that AADE is pushing to identify any issues that may have occurred.
Also, you can activate the next option so that the customer can proceed to complete the order in the event that IAPR is out of service. When IAPR is out of order, you will receive a notification in your email.
Display
- The available options concern the display of the invoice/receipt option at checkout (select box or radio buttons).
- The next option, you can select it if you want capital characters to appear in the invoice fields at checkout.
- In the next option you have the ability to display the DOY in a drop-down list on the order completion page.
Invoices
-
- If you wish to issue a document through the plugin, you can enter the link of the logo you would like to appear on the documents you issue, in the field “Invoice Logo Url“.
- In the two fields in “Invoice Settings” you can define the series and then the starting number of the series, that is, the number from which the numbering of the documents will start .
- Similarly, in “Receipt Invoice Settings”, “Credit Invoice Settings”, “Cancel Invoice Settings”, “Return Receipt Settings” and “Cancellation Receipt Settings” enter in the first field the sequence and in the second, the starting number of the numbering.
- By activating the option “Automatically generate invoice”, when you change the status of the order to Completed, the in will be created automatically.
- By activating the “Automatically generate invoice” option, when you change the status of the order to Completed, the documents will be generated automatically.
In “Auto finalize and send” when you enable it, the documents will be finalized and sent to the customer’s e-mail when the order status changes to Completed. - Next, you can set tax exemption options. In particular, the first option, “VAT exemption when the buyer has a valid VAT on VIES“, excludes the tax in the case of a foreign customer who wants an invoice and has activated his intra-Community transactions. The second option, “Tax exempt when buyer selects a non europe country” excludes the tax in case it is a foreign customer and has chosen an invoice.
- In the following fields, you can optionally fill in the company details that will appear on the document and in case they are different from those defined in the WooCommerce general settings.
- In the fields for the separators, you define the symbols that will separate each piece of information for the string that will be added to the end of each document.
- Finally, you can enable the option below if you want the document string not to appear in the PDF.
POL.1150/2017
- Then, you can select specific categories and the corresponding zero tax rate for the exemption, based on POL.1150/2017, for valid VAT numbers, through IAPR.
- Next, if you have a store that includes products listed in POL.1150/2017, such as mobile phones, you can define which categories of products can be exempted from the tax in case of issuing an invoice. In the next option, “Tax Category”, you choose how tax-free is defined in WooCommerce in your online store.
- In the third option, you choose to which page in your online store the customer will be redirected for reduced VAT based on article 39a.
- Finally, activate the next option to remove the tax from the products at the checkout when the customer will fill in a valid VAT number.
Reduced Taxes for islands
- You can enable and then map the corresponding tax rates to provide a tax reduction for island zipcodes.
- Tax rates must be set correctly in WooCommerce settings first.
License
- In the last two fields you fill in your e-mail and the API you received by purchasing the plugin, in order to ensure its correct operation and automatically receive updates of new versions.
- Click save changes to complete the settings.


Information about the Invoice (Timologio) for WooCommerce plugin
- After the successful installation of the plugin, when opening an order, on the right side of the screen, the invoice options column appears depending on whether the customer has selected a receipt or an invoice. In the first tab, you can create the order document, view it in a PDF file and send it to the customer’s e-mail. Then, the options to display in a PDF file or to cancel the document, in case of an error, are displayed, while by choosing to finalize, its version is finalized and becomes available for viewing on the page of the customer’s orders.
- In addition, you have the option to download the delivery note and send it to the customer.
- In the second tab, you can upload your own file, eg a scanned receipt, in place of the document, so that you can send this electronically to your customer via WooCommerce. In case you do not wish to issue an invoice, no further procedures are required.
- In case you wish to send the document to the customer, after going through a tax mechanism, it is possible to upload a file with the scanned document. In this way, the scanned file can be sent to the customer’s email, the simple document that is created electronically through the plugin.
- Finally, in case you wish to add the invoice details to an order, auto-completion also works in order management. What you need to do is simply select the invoice version and fill in the VAT number. Autofill works for the following fields: DOY, Activity, Company Name, City, Address & Postal Code.
*The automatic completion works as long as the validity of the VAT number has been checked through the IAPR.

Below are the features provided if the customer has selected an invoice:

Similarly, the same features are provided if the customer has selected a receipt:

Below you can see how our plugin documents appear:

Document Invoice:

Receipt:

Delivery note:

For more information please look up to FAQ and Developers tabs on our plugin’s page.
For any problem or question that arises, do not hesitate to contact us at support@webexpert.gr
