To start accepting payments through the IRIS service, you will need to seek activation of the IRIS service for e-commerce at a branch of the cooperating bank. If you need to fill in the documents that you will send the bank and give you access to the DIAS platform you can proceed and add to its setting appropriately, according to the instructions you will receive.
Once your request is approved by the bank, you can proceed with the installation of the plugin by following the steps below:
Installation and activation
- You log in to your website with administrator rights.
- From the control panel select “Plugins” and then “Add New Plugin”.
- At the top of the page select “Upload Plugin”.
- From the box that will appear, click on “Select file” and in the pop-up window, select the .zip file that was downloaded from our website, during your purchase.
- Click “Install Now” from the dialog box.
- After the file is successfully uploaded, you will be presented with the “Activate Plugin” option, which you select.
Initial settings
- From the Web Expert option in the Control Panel select the plugin.
- Fill in your e-mail and the API you received by purchasing the plugin, in order to ensure its correct operation and automatically receive updates of new versions.
- Click save changes to complete the settings.
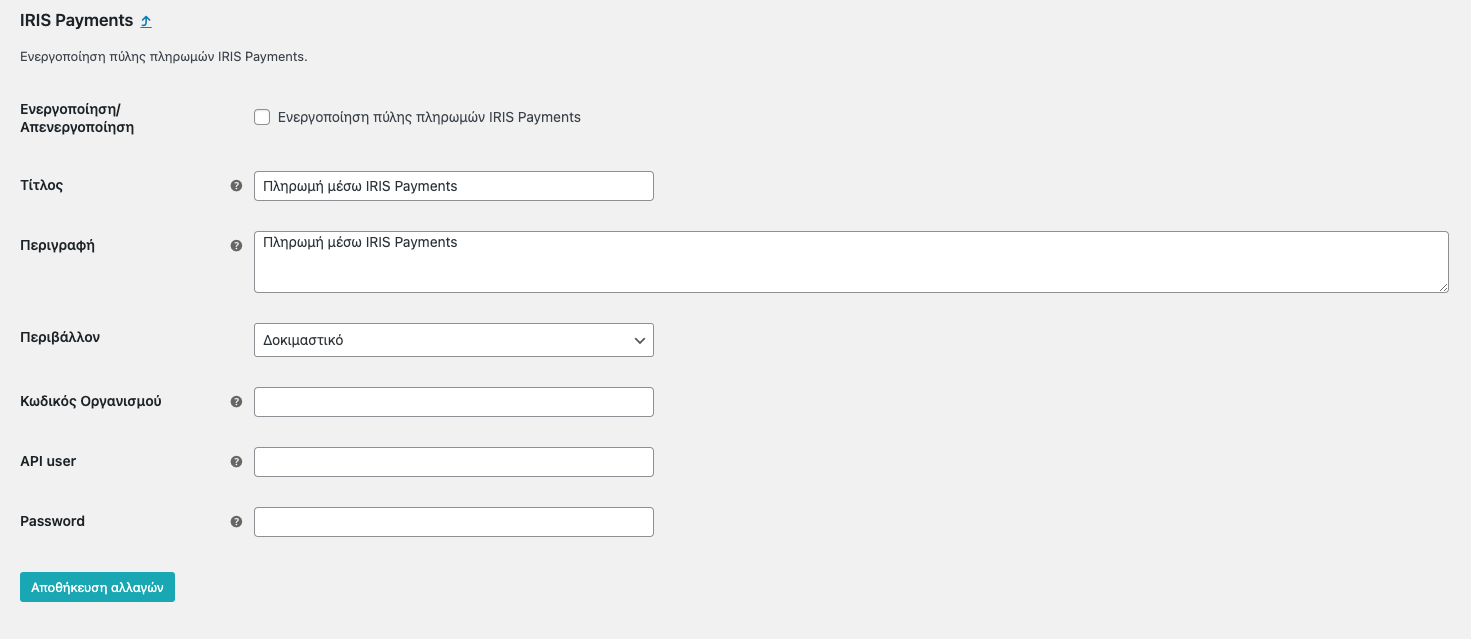
Then select WooCommerce Settings to proceed to the plugin settings:
- In the first option “Enable/Disable”, it should be defaulted to enable so that you can use the gateway.
- Where “Title“, the name of the plugin displayed on your page when completing the order and “Description“, the explanation that will accompany this title
- In the “Environment” select whether you are in a test or production environment.
- In the “Organization Code” field, fill in the code that appears in the file you have received from the bank.
- In “API user” and “Password” fill in the API user and password that exist in DIAS.
- Select save changes to proceed.
Obtain live credentials
In order to proceed with the process, you will be asked to log in to https://apps.dias.com.gr/dias-portal/login.jsp. More specifically:
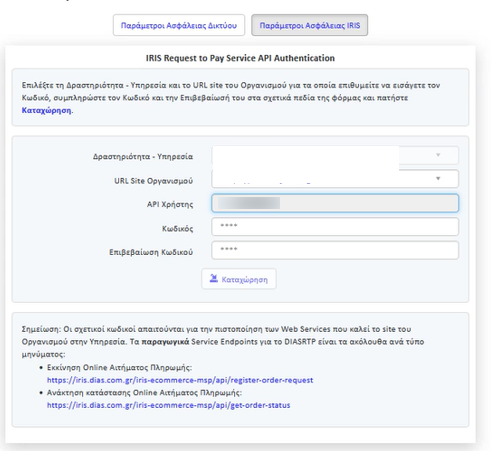
a) Go to the page https://apps.dias.com.gr/dias-portal/login.jsp and enter the DIAS system with the information (username and password) you have received from the bank.
b) Once logged in select “Payment Gateway“.
c) Then select the option “Security” and then “IRIS Security Parameters“, where you will set a desired code.
Summarizing the table above, your details are listed:
- Your site’s URL(*).
- API user is predefined by DIAS and you cannot change it.
- Finally, fill in a code in the “Password” field and in the last field “Confirm password” again fill in the password you entered.
*Attention: register in DIAS the URL of your site correctly along with the protocol (http(s)://).
**You have to fill in our plugin settings the API user, Password (from DIAS) and Merchant Code (that exist on the pdf you receive from the bank).
Test transaction
IRIS Payments for WooCommerce, like all banks, requires the system to be properly tested. To perform this check, you should follow these steps:
- In the plugin settings in the “Environment” field select “Test”.
- In “Organization Code” fill in the code that appears in the file you received from the bank.
- In “API user” and “Password” fill in the API user and password that exist in DIAS.
- Select save.
- From the Control Panel, select “Products” and create a new product of a very small value, eg €0.10. We recommend that, when creating this product, you set it as private in order to preserve the smooth operation of your online store.
- Go to your website and place a new order with the test product you created in the previous step. We would like to inform you that in the test environment you are given the possibility to choose up to the logo of the bank you would use to complete your payment.
- Then, from the IRIS Payments for WooCommerce plugin settings form, you disable the gateway, that is, the first field of the form and not the plugin. In this way, you close the gateway temporarily until you get the approval from the bank. It should be noted that the wait for the bank’s final approval lasts a certain number of days, as long as the conditions set by the bank are met.
Plugin setting
- In the plugin settings under “Environment” you directly select “Productive”.
- In “Organization Code” fill in the code that appears in the file you received from the bank.
- In “API user” and “Password” fill in the API user and password that exist in DIAS.
Select save.
For more information please look up to FAQ tab on our plugin’s page.
For any problem or question that arises, do not hesitate to contact us at support@webexpert.gr


