To install the Eurobank WooCommerce Payment Gateway (Worldline) plugin you will first need to contact Eurobank and apply for an electronic POS, i.e. e-shop card charging. Then, if your request is approved by the bank, you have the opportunity to install the plugin, following the steps below:
Installation and activation
- You log in to your website with administrator rights.
- From the control panel select “Plugins” and then “Add New Plugin”.
- At the top of the page select “Upload Plugin”.
- From the box that will appear, click on “Select file” and in the pop-up window, select the .zip file that was downloaded from our website, during your purchase.
- Click “Install Now” from the dialog box.
- After the file is successfully uploaded, you will be presented with the “Activate Plugin” option, which you select.
Initial settings
- From the Web Expert option in the Control Panel select the plugin.
- Fill in your e-mail and the API you received by purchasing the plugin, in order to ensure its correct operation and automatically receive updates of new versions.
- Click save changes to complete the settings.
Then go to WooCommerce Settings in order to configure the settings of the gateway:
- The first item, “Enable/ Disable” should be the default, so you can use the gateway.
- In the next option, “Test Environment“, if you are performing a test, check the box to enable it and set the test mode.
- Where “Title“, the name of the plugin displayed on your page when completing the order and “Description“, the explanation that will accompany this title. In “Instructions” you can fill in a text that will appear in the new order email to the customer.
- In the fields “Merchant ID” and “Shared Secret” fill in your details from the contact e-mail with the bank.
- In the “Max Installments” field, you have the option to set the maximum number of installments you will have for your customers.
- Then, in the “Installments” field, you can define the range of installments depending on the order amount, based on the auxiliary form listed just below this field, in the examples.
- Finally, the last transactions with the bank are displayed in the log field and this field cannot be edited.
- Click Save Changes to proceed.
Obtain test codes
- The first step is to enter https://developer.cardlink.gr/. Since this is the first time you are entering, you will need to register.
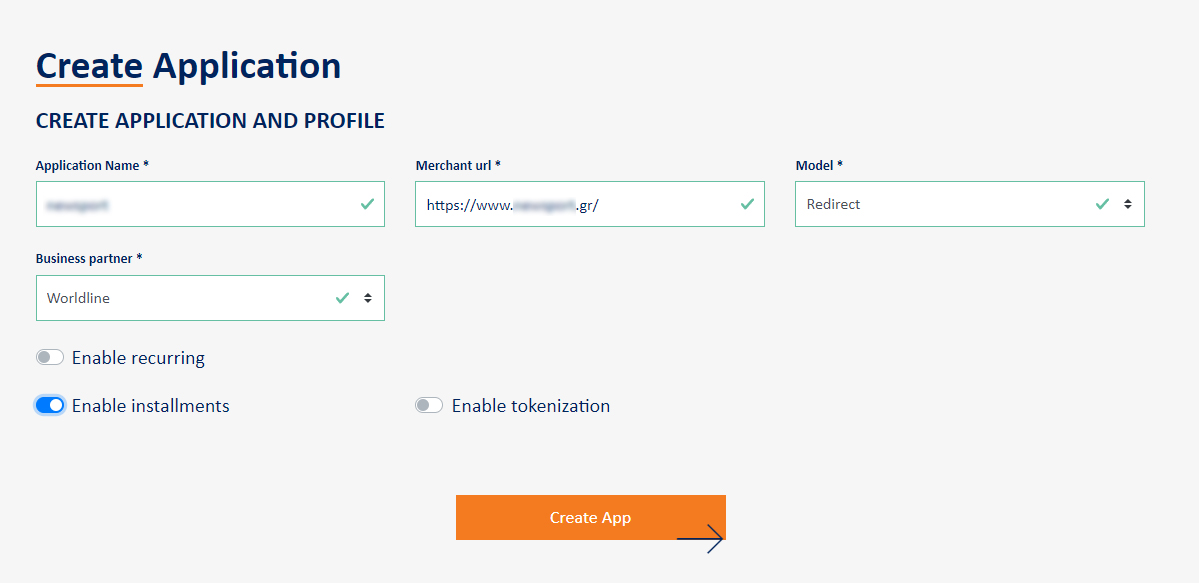
- Then you need to create new App and fill in your information as well as the Business partner:
a) In Model, select Redirection.
b) In Business partner select Worldline.
c) If you wish to receive installments then you will activate “Enable installments”.
d) Select “Create App”.
- As soon as you create the application (App), you will be shown the MID and Shared Secret, which you should fill in the plugin settings
Test transactions
Eurobank, like all banks, requires testing the proper functioning of the system. To perform this test, you must follow these steps:
Attention! The first step is to enter https://developer.cardlink.gr/. Since this is the first time you are entering, you will need to register.
- In the plugin settings you fill in the Application Keys, i.e. MID and Shared Secret Key, which you got from Cardlink for Developers.
- Then you enable the test environment in the plugin settings.
- From the Control Panel, select “Products” and create a new product of a very small value, eg €0.10. We recommend that, when creating this product, you set it as private in order to preserve the smooth operation of your online store.
- Go to your website and place a new order with the test product you created in the previous step.
- You complete the test order by selecting the Eurobank Gateway as the payment method and fill in the cards included in the Cardlink for Developers Cardlink environment (Starter Guide>Test cards). Some transactions should succeed, while some should fail to complete.
- Upon successful completion of the test transactions you will go to the Cardlink for Developers environment in the App you created and select “Go Live”. A modal will open where you will fill in your details and inform that you have successfully completed the test transactions so that the production codes can be sent to you.
- Then, from the Eurobank WooCommerce Payment Gateway (Wordline) plugin settings, disable the gateway, that is, the first field of the form and not the plugin. In this way, you temporarily close the gateway until you receive approval from Eurobank. Also, at this point you can delete the test orders and the product you created.
- Finally, after the bank contacts you again, approving the correct functioning of the gateway, you can go to the settings to reactivate the gateway, replace the test codes with the new live ones that will be sent to you, and disable the option of the test environment. It should be noted that the wait for the bank’s final approval lasts a certain number of days, as long as the conditions set by the bank are met.
Below you will find the Test Cards page:
Notify the bank by selecting “Go live”:
For more information please look up to FAQ tab on our plugin’s page.
For any problem or question that arises, do not hesitate to contact us at support@webexpert.gr


